QNX
Momentics 6.2.1 Up and Running in 10 Minutes
Last update:
1 Introduction of QNX & Momentics IDE
2.1 How to get help & report problems?
2.2 How to Access QNX from home?
2.3 How to print my program? How to access my files from
home?
2.4 I met problems
with QNX and NFS, what should I do?
2.5 Can I install QNX at home?
2.7 Common questions relating to Momentices IDE
2.8 COEN421 relating questions
2.9 Miscellaneous questions and answers
1
Introduction of QNX &
Momentics IDE
It is a quick start to QNX Momentics
6.2.1 Integrated Development Environment (IDE). The purpose is to introduce you
to the QNX software environment of the real time system laboratory, and to help
you start writing your first program for QNX real-time system in a short time.
1.1
How
to get help from QNX?
In QNX’s Photon GUI, you can click
“Help” on system shelf, which should be the second item of application on the
right side of your desktop by default.
You can also use the browser, by clicking Launch->Internet->Mozilla, to access the web site “www.QNX.com“. You might need to set the
proxy server after you first login. It can be done like that: launch the Mozilla, click:
Edit->Preferences...->Advanced->Proxies,
select the “Manual proxy configuration”, and key in “10.0.8.2” port “80” for
all the services. Please note that it is the proxy settings for Concordia's QNX
laboratory only.
And of course, if you want to study the QNX and Momentics on
Windows, Linux or any other systems, you can use any Internet browser to visit QNX’s web page to get more information.
1.2
Hello
world program
You have two ways to build your program, by command line or
IDE.
Using the command line method, you need to type your program
by using vi or ped and save
it as hello.cpp. Then use g++ to compile it.
g++ hello.cpp –o hello
You can run your program by keying in:
./hello
Next, we start to build, “Hello world”, in Momentics.
First, Click Launch->Development-> “Integrated
Development Environment ”.
Second, to make sure you are under the “C/C++
Development Perspective”. You should keep in mind that at any time there are
several perspectives (or kind of views) in the IDE. If you cannot find certain
buttons you are supposed to have, maybe you are under the wrong perspective.
Our purpose is to develop our first program, so the right perspective is “C/C++
Development Perspective”. You can select this perspective, by clicking
the button on your left side as the figure shown below.

Figure 1: Different
perspectives
Then, let us create our first C++ project. Why it is a
project, not a program? According to QNX's
manual, “In the IDE, a project is a collection of related resources (i.e.
folders and files) for managing your programs. Although you can work on
individual resources (e.g. edit a file), most of what you do in the IDE is
project-oriented -- you build projects, manage versions of projects, share
projects with other programmers, and so on. ” And, do not to be afraid, it is
so convenient to create a “Hello world” project, you do not even have to key in
the keyword “prinf” or “cout”.
All the things can be done automatically. You can find the details to
create the project from the book QNX
Momentics Professional Edition User's Guide, which can be found by clicking
“Help” on system shelf.
Let us do it step by step.
Click the “QNX C++ Application button”. If you cannot see
it, you can select “File->New-> QNX C++ Application button”, or “File->New->
Other…” and select what you want.
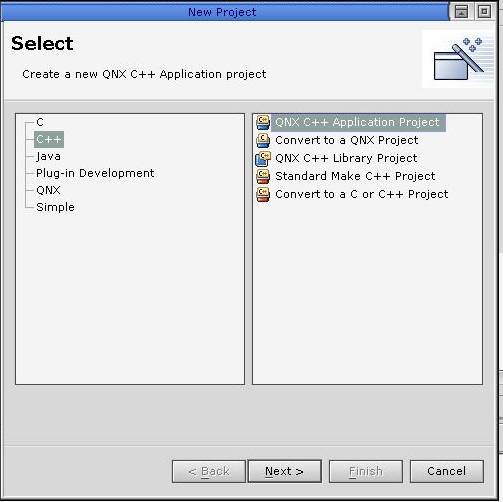
Figure 2: Create a new
project
Key
in the project name, let's say “helloworld”.
Click
“next”, check the “x86 little endian” box, and click
“finish”.
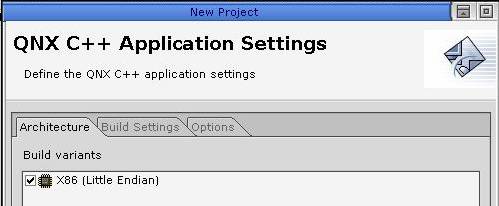
Figure 3: Application
settings
You will then get the hello world program. It will print,
“Welcome to the Momentics IDE” in the console.
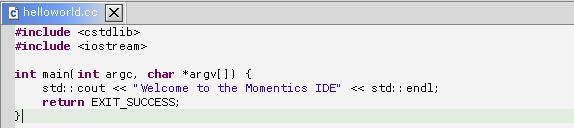
Don't like it? You can key in your own, such as “Hello
world”.
1.3
Build
your binary codes
You need to convert your C or C++ source code into machine
codes in order to run them on target board. It is called as build.
Switch the perspective to “QNX System Builder Perspective”,
right-click the “Helloworld”
folder, click “Rebuild Project”. After a few seconds, you will have your first
binary codes in the real-time world.
1.4
Target or local host?
In most cases, the real time codes are supposed to run on an
embedded target board. You have many choices of the target CPU and peripherals.
But, if the desktop PC has a QNX operating system, you can also run and debug
your codes on that PC.
To do local execution/debugging, you should switch the
perspective to “Debug Perspective”, click “Run->Run...” or “Run->Debug...”
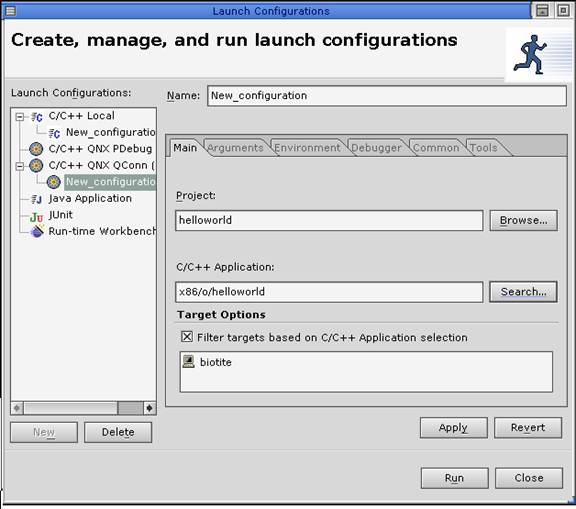
Right-click the “C/C++ Local”, select “New
Configuration”. Then select your project, helloworld,
and C/C++ applications, “helloworld” for running, “helloworld_g” for debugging.
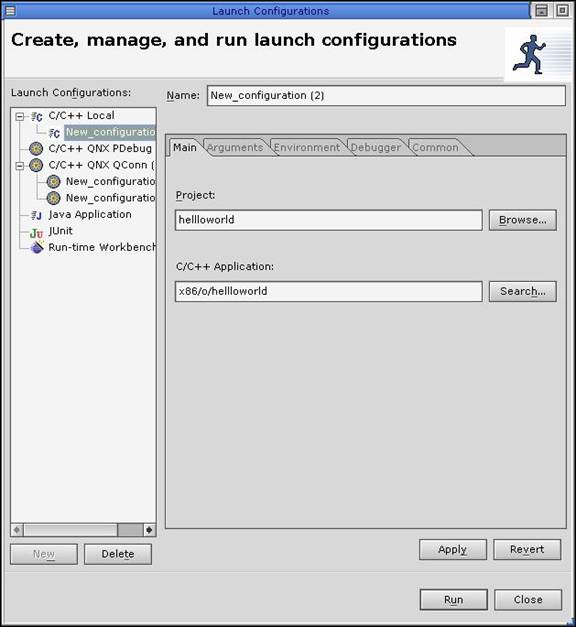
Figure
5: Local configuration
Click Debugger tab and check the options. Make sure you
selected “GDB Debugger”, NOT “QNX GDB Debugger” as your debugger.
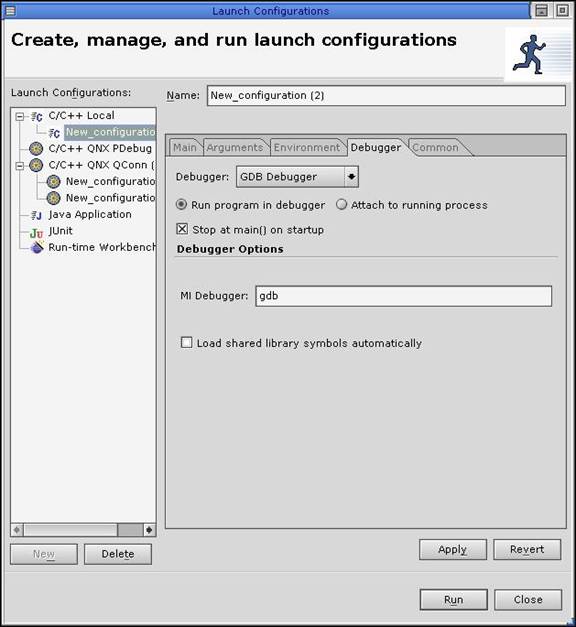
Figure
6: Debugger selection
Click “Run”, it will bring you “Hello world!” in
Console window. The program is running on your local desktop PC.
Let us run the “Helloworld”
program again on the target board. A debug server program, “qconn”
should be launched on the target board before your Momentics can communicate
with it can to download the codes, run the codes and debug them. To do that on
your target board, login and type “/bin/qconn&”. There might be some error messages like:
“Unable to attach debug device/ Operation not permitted.”
“Prof-resmgr_init: Couldn't attach
as /dev/profiler: Operation not permitted.”
Please just neglect them, because you do not have root
privilege. Because if you do not debug the OS core functions, you do not need
the root privilege.
On your desktop PC, click “Run->Run...”, Right-click the “C/C++ QNX Qconn(IP)”,
select “New”. Then select your project, helloworld,
and C/C++ applications, also “helloworld”. You may
find that there is another file named helloworld_g.
That file is for debug; you may use it later.
Then in “Target Options”, right click “Add Target”.
Then choose target name as your wish, for example, “Localhost”.
Then in “QNX Connector Selection”, uncheck the “Use local QNX
Connector”, in “Hostname or IP”, key in the target board name, for
example “biotite” and let the port as default “8000”.
The last thing is to click “Finish”.
Click Debugger tab and check the options. For target
execution and debugging, make sure you selected “QNX GDB Debugger”, NOT “GDB
Debugger” as your debugger.
Click the target name you just created, and then click “Run”,
it will bring you “Hello world!” in Console window. This time, the program is
running on your target, IDE just talk to the “qconn”
to gather the information and send commands.
1.5 Debug “Hello world!”
Do you like to debug your “Hello world!”? There is of course
no need for it. But if your codes are very complex, you may wish to debug them
instead of running and seeing their result. You can set breakpoints, see the
variables, CPU registers, to step over or step into your source codes,..etc.
So let us add some codes so that you can have a chance to
see the variables, because there are no variables to be seen in “Hello world!”.
Add some lines as below under your “Hello world!” line.
int i, sum=0;
for (i = 1; i<=100;i++)
sum+=i;
std::cout << “Sum of 1+2+3+..+100 is:” <<sum <<std::endl;
Then build it.
You can simply double click or right
click on the small gray area to the left of your source view. A small circle is
placed there to indicate the breakpoint is set. Click “Run->Debug...”, select the target “locolhost”,
select the file “helloworld_g”, and click debug. The
“xxx_g” files contain debug information, so if you
want to debug the program, you must select the “xxx_g”
files, and if you just need to execute them and to see the result, please
select the file without “_g” in their name.
The program will run and stop at the
first line of your program; you can click “resume” to resume it. And it would
stop at the breakpoint you set. Then you can see the variables, and to use the
debug functions like “step over”, “step into”, read/write CPU registers ...
etc.
2 Frequently Asked Questions
2.1 How to get help & report
problems?
Send e-mail to
sdesk@encs.concordia.ca.
If you are in the QNX lab, use “ssh” to reach unzen2, and then choose “connect to an ECE
system” from the menu. You will then be
able to send e-mail as usual, as long as you use a text-based mail. (Any kind of X programs will not work.)
2.2 How to Access QNX from home?
Use “ssh”
to connect to “qnx-gw2.ece.concordia.ca”, log in with your QNX username and
password, and choose “Connect to a QNX workstation” from the menu. Then you can select a QNX in the lab for
remote access. If your host operating system is linux,
ssh should be already available.
If you are using Windows, you need to download a ssh client from
or
http://hp.vector.co.jp/authors/VA002416/teraterm.html.
You can connect to any machine in
the labs, but beware that if someone is sitting at the console, they will
probably not check for other users when they decide to shut down or reboot the
machine. "peel" is the QNX machine in the
machine room without console access. As long as it is not overloaded, it would
be a good choice for working remotely.
The limitation of the remote access
is that you can only make use of textural user-interface and command-line
compile environment.
2.3 How to print my program? How to
access my files from home?
No printing just yet. You can however access your files from
the rest of the ECE network, and print that way.
You home directory will be in
/project/qnx/homes/coen421/j_smith or /project/qnx/homes/coen320/j_smith.
You can use a ssh files transfer client program such as “WinScp”, connect with an ECE machine such as
“dea.ece.Concordia.ca”, transfer your files to that directory on ECE network.
You can get the program from:
http://winscp.sourceforge.net/eng/download.php
2.4 I met problems with QNX and NFS , what should I do?
There are some quirks that arise
from bugs in the QNX implementation of
Due to a QNX problem with
Also, you may not be able to execute
a file if the group ownership is not correct.
All your files should be owned by a group corresponding to your course
number (i.e. coen421).
If you are getting a “Permission
Denied” message for your executables and you are having trouble setting the
permissions correctly, e-mail sdesk@encs.concordia.ca and we will help you.
You may also come by H-927 during
office hours. (
You may also get strange errors when
trying to run a freshly compiled binary on both the development systems and the
targets for the first time. Something
like
./hello[1]:
syntax error: “(“ unexpected
Just run it again, it will work on
the second try.
If you get a “memory error” on a
binary that should run with no problems, try doing
cat your_file_name > /dev/null
and
then run it again.
Please do not try to recompile the
binary on the target. In the “real world” your target will most likely not have
any kind of development environment on it.
2.5 Can I install QNX at home?
QNX non-commercial version is free
for personal use and downloadable from get.qnx.com. But the Momentics IDE is
not available on non-commercial version.
You can install it either as a
stand-alone operating system on its own partition (not extended though, you
must have a free primary partition) or as a package under Windows.
The QNX web site provides
information on how to install each version. A searchable “Knowledge Database”
is also available at qdn.qnx.com, and human help can be found on various
newsgroups available at the news server inn.qnx.com. (A good group to start with is qdn.public. qnxrtp.newuser).
2.6 How to access a floppy?
In order to use a floppy disk, you
have to mount it first and then unmount once you are
done with it. The command “dosflopmount” will mount a
DOS-formatted floppy in the directory /floppy.
You may then read and write file to the floppy. When you are done, type
“dosflopunmount” to clean up and make sure all the
data was written to the disk. (As opposed to being in the buffers.)
Be careful, other students can
read/write your floppy while it's mounted.
2.7 Common questions relating to Momentices IDE
Q1:
How do I use the develop
machine to debug some programs locally?
A: If
you want to debug your program locally on the development platform instead on a
target board, you can click “Run->Debug” , click “c/c++ local debug” and create a new configuration.
An important thing should be stated here is, you MUST use the “GDB debugger”,
NOT “QNX GDB debugger”. To do so, please click the “debugger” tab and select
“GDB debugger” in that window.
Q2:
Whenever I click the
IDE icon, it shows the intro box, but it stops running after that.
A: You
might need to delete (or better to rename) the “.medadata”
directory under your home ./workspace , for example:
cd ~/workspace
mv
.metadata .metadataold
But,
please note that by doing so; you will lose your previous configuration of the
IDE. And you must import your existing project one by one by yourself. See Q10 for detail.
Q3: Can I launch the Momentics IDE in
terminal window?
A: Yes.
You can key in “qde” in terminal window.
Q4: How to tell IDE that '.hpp' is a c/c++ source file and show them in different
colors?
A: Click “Window->Preference->Workbench->File Associations”,
then add the “*.hpp” and assign it to C editor.
Q5: How to change warning levels to suppress
my warnings?
A:
Right click your project name, click 'Properties', click the 'Compiler'
tab , change the Warning level.
Q6: Why sometimes I cannot use “step over”,
“step into” or “resume” functions?
A:
Check if C/C++ debug is enabled. Click “Window->Customize
Perspectives…->Others”, check the box before
“C/C++ debug”.
If
it still does not work after you did that. You might need to delete (or
better to rename) the “.medadata” directory under
your home ./workspace , for example:
cd ~/workspace
mv
.metadata .metadataold
But,
please note that by doing so; you will lose your previous configuration of the
IDE. And you must import your existing project one by one by yourself.
Q7: When I use printf() or cout, the outputs to the console sometimes do not show
immediately. I need to terminate the program to see the result, or need to
print a lot of things to “push” the result out. Why?
A: It
is a known problem that would be fixed in future Momentics releases. But you
can add a line “setvbuf (stdout,
NULL, _IOLBF, 0);” as a patch in your main program to avoid the problem. Your main() should be like:
#include
<stdlib.h>
#include
<stdio.h>
int main(int
argc, char *argv[]) {
int i,j;
setvbuf
(stdout, NULL, _IOLBF, 0);
return 0;
}
Q8:
Some items are missing in the “Launch” menu, what should I do?
A: Sometimes the Photon
GUI of QNX may have some problems, or you deleted something under yourhome/.ph. There
is a copy of .ph available under /public directory. You should copy the .ph
directory back. You can use:
cd ~
mv
.ph .phold
cp –r
/public/.ph .ph
And, if you are too lazy to do that,
you can just type the name of the application in terminal window to launch
them. For example:
You can type “ped”
to launch the text editor, and ”xpdf”
to run the PDF viewer.
Q9: How
to delete a target board configuration in IDE?
A: Switch to the “C/C++
Development Perspective”, click the “Navigator” tab in “Navigator” window,
right click the target name, and then click “delete”.
Q10: How
to import a project into IDE?
A: If you have some
existing projects under your workspace but they can not be seen in the IDE, on
possible way to import the projects is to create a new project with the same
name as the directory name. For example, if your have a folder ~/workspace/lab3
with the source code, you can create a new project at the same place and called
lab3. Then the project folder will be visible in IDE. But when the IDE create
the new project, it will create a hello-world file called lab3.cc as well. You
should delete the file and rebuild your project. Beware that, if you already
have a file called lab3.cc in your project, you should rename it before your
create/import the project and change it back if you want.
Q11: If
I have a pre-complied QNX “*.o” file but I don’t have the source code, could I
link it with my applications?
A: The answer is yes.
But you must inform the IDE that you have this file to link with your
application. You can debug your program; but the limitation is you can not step
into the functions offered by the “*.o” file because you don’t have relevant
source code.
To do that, please copy the “*.o”
file (for example rs232.o) to your source code folder, let’s say
“~/workspace/lab4”. Right click the project name “lab4” in c/c++ project window
and select the “properties”. Then select the “Qnx
c/c++ project”, click the “extra libs” tab and add
the full path of the “*.o” file, for example
“/home/coen421/j_smith/workspace/lab4/rs232.o”.
2.8
COEN421
relating questions
Q1: What is the function of the 'Console
Window' in IDE?
A: If you launch the
program in IDE, the console windows displays anything your program (running on
the target) send to “stdout”, (by the functions such
as printf(),
cout, putchar() ), and
allows you input something and send them to “stdin”,
so that if you use scanf(), cin,
getchar(), you can get the input from console window
instead of from target.
But, please note that, if your use the device “/dev/con1” (or con2 con3...) to
input and output, the console window will NOT get the control. In this case,
the inputs and outputs are still happen on your target.
Q2: Can I use the “Serial Window” in IDE to display the strings from
target or dummy terminal?
A: No, you cannot, because this window shows you the characters from/to
the serial port of your desktop PC. And the serial ports of your desktop are
not connected to the target/dummy terminal.
Q3:
Why cannot I link with any target board via any desktop PC in the lab?
A: The connections
between target boards and desktop PCs are restricted because of the security
reasons. Please take a look of the link drawing in the lab to see which target
can link with which desktop.
2.9
Miscellaneous
questions and answers
Q1: Is
there a better shell than ksh?
A: You
can use “bash”.
Q2: How do I view a PDF file?
A: Launch
the “xpdf”.
Q3: I have logged in and everything is weird
and my files are missing.
A: Log out and reboot
the machine. (The
3 Useful links:
QNX
home page
It
is the QNX Community Portal and BBS system. Have problems? Come here and talk
about them with other QNX users.
http://www.qnx.com/download/index.html
Free
download of QNX Non-Commercial Edition, training documents and video clips. It
is a very good point to start. You can download the free version, see the
slides, and listen to the instructions that to teach you step by step about the
QNX products.
http://www.qnx.com/developers/newsgroups.html
QNX
news groups
http://www.qnx.com/developers/articles/
QNX technical articles
http://www.qnx.com/developer/docs/momentics621_docs/momentics/index.html
Do
not know which book you should start first? Please try this link.
QNX
Momentics Professional Edition User's Guide
http://www.qnx.com/developer/docs/momentics621_docs/ide_en/user_guide
This
User's Guide for the Integrated Development Environment (IDE), which is
part of the QNX Momentics development suite, accompanies the software and is
intended to introduce you to the tools environment and to help you learn about
using it effectively to build your QNX Neutrino-based systems.
QNX
Momentics Professional Edition Programmer's Guide
http://www.qnx.com/developer/docs/momentics621_docs/neutrino/prog/about.html
The
Programmer's Guide is intended for developers who are building
applications that will run under the QNX Neutrino Real-time Operating System.
http://www.qnx.com/developer/docs/momentics621_docs/photon/prog_guide
The
Photon Programmer's Guide is intended for developers of Photon
applications. It describes how to create applications and the widgets that make
up their user interfaces, with and without using the Photon Application Builder
(PhAB).