User Guide of
ECE Real-time QNX Lab
Contents
1. About Real-time QNX Lab
Real-time QNX lab is in room H832 and equipped 12 real-time workstations. Each workstation is running Windows 7 with some real-time package.
This lab is a open lab for COEN320-registered students. They can access this lab when the school is open. The doorcode can be gotten from your TA.
Contacts
Real-time QNX lab is managed by ECE Engineering Specialist, Dan Li. Any problem regarding to this lab, you can contact him:
- Emai: danli@ece.concordia.ca
- Call: (514)8482424 x 3148
Packages on Real-time development Machine
- QNX Momentics 6.4.1 (Momontics 4.6) - The QNX Software Development Platform 6.4.1 includes the QNX Neutrino RTOS 6.4.1 and QNX Momentics Tool Suite 6.4.1. It is a complete and comprehensive development environment for QNX Neutrino-based devices and system
- VMware Server 2.0 - VMware Server is an easy-to-use Windows application that provides a superior introductory experience to server virtualization for Real-time lab to host a QNX target.
- Matlab 2009b, etc.
2. Real-time User Accounts
Real-time account
Once you have registered ECE real-time course, i.e. COEN320, COEN421, ELEC481, ELEC483, one specific real-time account shall be created after new semester starts. Real-time account is separated with your ENCS user account. Initially user’s real-time account is created based-on ENCS account and managed on ECE real-time server ‘Tissot.realtime.private’. One user real-time userID is same as his/her ENCS user ID but real-time password is created as same as the uer ID, e.g. if an user ID is named as ‘a_student’, then the pre-assigned password is ‘a_student’.
Login Real-time Domain
Press ‘Ctrl+lt+Del’, input your real-time ID and password, you can login any workstation in the lab. When you first time login real-time domain, the workstation may take more time to create your profile.
Map ENCS Drives
Once you log on real-time workstation, the system shall run a script to map your ENCS network drives G: and U: . The log-in pop-up window is shown as the followed:
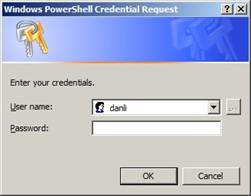
The detailed information about these two network drives please refer to ENCS helpdesk webpage. After network drives are mounted, system shows your drives , see the followed screenshot.
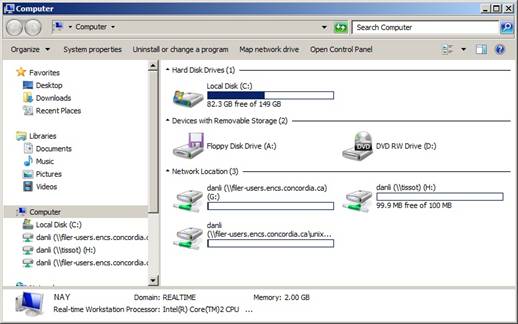
Drives
- G: \ - ENCS personal Windows home
- U: \ - ENCS personal Unix home
- H:\ - ECE real-time home
Real-time system will create a working directory at “G:\realtime” , when you first time log in. This directory is primary real-time workspace. You shall store your file and code under this directory. The reason is G:\ drive is easy to access and more safe than H:.
Change Real-time password
Once you log on real-time workstation with default password, you shall change it immediately. Launch a web browser, and input the URL:
https://tissot.realtime.private:8888/
Once the user enters his name and password, he can perform changes in his personal configuration. The showed functionality is the following:
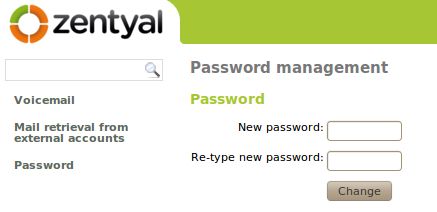
Then you can change the current password in user’s corner.
Remote Access Real-time System
As deafault, a real-time user could not access ECE real-time network outside the lab. The reasons are :
- Learning how to use real-time IDE is a part of real-time lab teaching, and remote desktop feature is NOT allowed for security reason.
- Working on a remote real-time server will involve another real-time account and working space, and so on. So far no way to centralize the working directory for local and remote access.
But if you really need to use a remote access real-time server for your project, you can ask your instructor and TA for an approvement first, then contact the real-time system administrator, Dan Li.
3. Real-time Environment
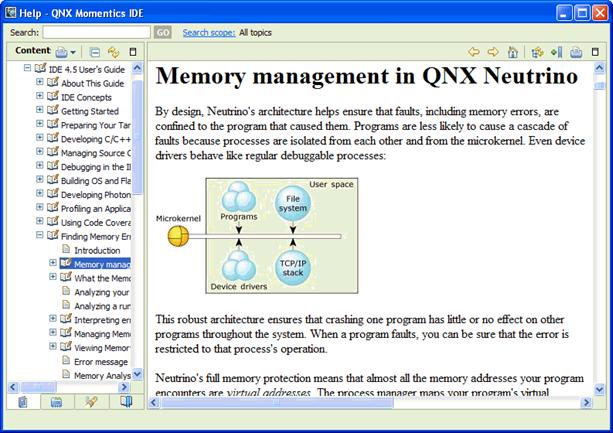
To write programs that run under the QNX Neutrino real-time operating system (RTOS), the first thing you need is the QNX Software Development Platform (SDP). This includes QNX Momentics Tool Suite, which contains everything you need to develop programs that run on Windows development host. The tool suite features an extensive Integrated Development Environment (IDE).
The development host runs the QNX Momentics Tool Suite; the target system runs the QNX Neutrino RTOS itself plus all the programs you're going to develop:
Real-time Target machines
Regardless of whether you're connecting to a remote or a local target, as a real-time developer you have to prepare your target machine so that the IDE can interact with the QNX Neutrino image running on the target. The IDE supports host-target communications using either an IP or a serial connection. Target systems need to run the target agent (qconn). See Target agent in the IDE Concepts chapter for more information.
In ECE real-time QNX lab, there are two targets available for each workstation:
- Remote access servers:
- ‘fuji.realtime.private’ (192.168.141.29) - running QNX 6.4.1
- ‘loihi.realtime.private' (192.168.141.27) -running QNX 6.4.1
- QNX system running on local virtual machine. (192.168.246.2)
Run Vmware
Click the icon ![]() , or from ‘start’ –‘ All programs’ –‘ Vmware server console’. Shown in the following figure. To start QNX Virtual machine, click the green arrow or click the command “Start this virtual machine’.
, or from ‘start’ –‘ All programs’ –‘ Vmware server console’. Shown in the following figure. To start QNX Virtual machine, click the green arrow or click the command “Start this virtual machine’.
Note:
- The virtual machine may take serveral minutes to ‘boot up’.
- Its IP is ‘192.168.246.2’.
- No user login needed for debugging.

4. A Real-time Program Project
 Start the QNX Momentics IDE on your development host. The first time you start the IDE, it asks you to choose a workspace, a folder where it can store your projects and other files. The IDE then displays its Welcome page. When you're ready to start, click the Momentics icon:
Now create a QNX C Project: from the File menu, select :
In the resulting dialog, give your project a name:
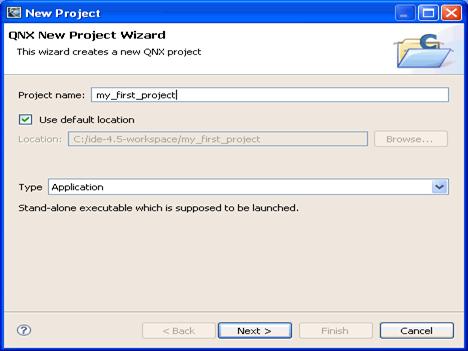
And then click Next. You now need to select a CPU architecture for the binary you're creating. To do this, go to the Build Variants tab. For a PC as target, choose x86.
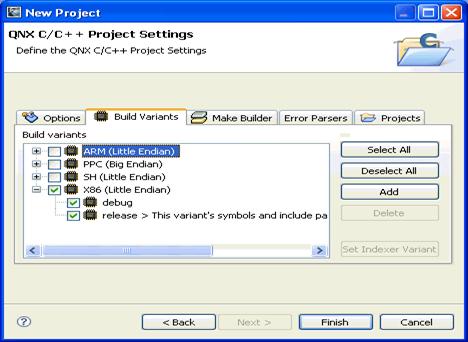
Selecting build variants.
Click Finish. A ready-to-use project structure with a Makefile is created for you, including a small program ("Welcome to the QNX Momentics IDE"), which you'll find in an automatically generated source code file.
The IDE now switches to the C/C++ perspective, which features the navigator, the editor, and other useful views, areas that display information that's relevant to the task at hand:

Communicating with QNX Neutrino (Target)
Your target system must be able to respond to requests from the development environment. To make this possible, you shall confirm a target available, see the section 3 – “Real-time Environment”
To access your target system from the IDE, you have to create a target project. Open the System Information perspective: in the Window menu, select . In the empty Target Navigator view, press the right mouse button and select New QNX Target... from the context menu:
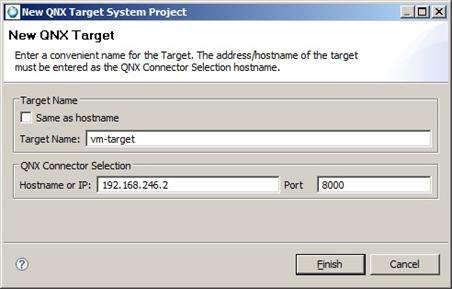
Now provide a name for your target system and enter its IP address in the corresponding field:
a. Local virtual machine - QNX VM target 192.168.246.2
 or
or
2. Remote QNX targets:
- Fuji.realtime.private
- Loihi.realtime.private
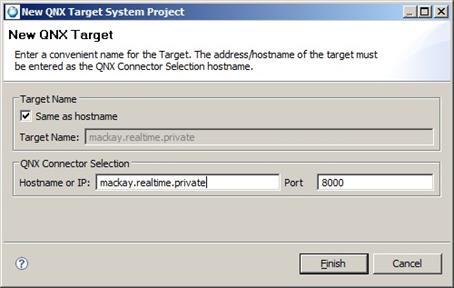
Input 'Fuji.realtime.private' or 'loihi.realtime.private' (NOT mackay anymore), Click Finish, and then select your new target in the Target Navigator. You will now see a list of all the processes in your QNX Neutrino system. The views (the tabs at the top) provide other information to you. You can find even more useful views in the Window menu under Show View.
Here you see what's going on inside your QNX Neutrino system.
Compiling and linking
Now switch back to the C/C++ perspective by choosing its icon in the right side of the toolbar:
Before you compile, you may want to select compilation with or without debug information. To do so, right-click the project name in the C/C++ Projects view, and then choose Properties. Click QNX C/C++ Project, click Build Variants, and then click on the small + symbol next to x86. Make sure that both the debug and release variants are checked. Click OK; the IDE offers to rebuild the project.
During the creation of the QNX C Project, a QNX-made directory structure with Makefiles was generated. Now to create a binary, please right-click the project name, and then select Build Project. The compiler and linker will now do their work.
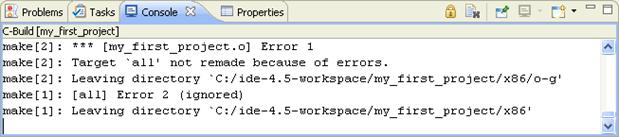
You will find the compiler output in the C-Build output in the Console view, including any errors (you shouldn't see any errors, but we've added one in the examples below):
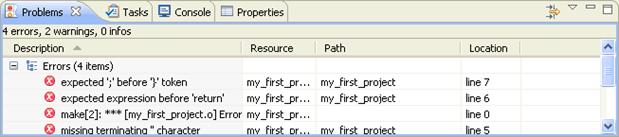
However, if errors occur during compiling, you will find the Problems view more useful, because it displays the output of the compiler in an interpreted and more readable fashion than the Console view:
The Editor view also gives you information about an error if you leave the pointer over it:
After the build operation, your binaries will be displayed in the Binaries folder. Physically, they're located in the CPU directory under o (for object) and o-g (-g for the debug option passed to the compiler). The IDE automatically created the corresponding Makefiles.
The QNX library libc.so, which contains many basic functions, is linked dynamically to your binary by default. If you want to add other libraries later, you can do so under the section. From there, click on QNX C/C++ Project, then Linker, and then choose Extra Libraries in the Category field:
Click Add, and type the name of the library, without the lib prefix or the extension. For example, to add the math library, libm.so, you just have to type m in the Name field:
Click OK. The linker will now link the library when you build the project.
Preparing to launch the program
To run and debug the newly built program on your target system, you need to create a launch configuration. It consists of various settings that affect how the program starts (e.g. command-line parameters, environment variables). You enter these once, and then you can use this collection of settings again and again.
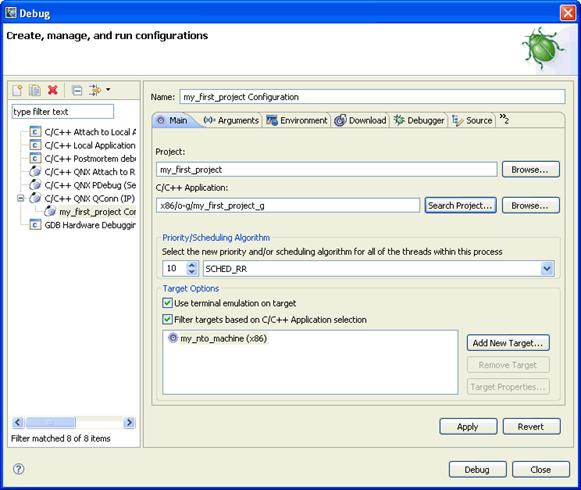
Now create your own launch configuration: from the dropdown menu beside the "bug" icon on the toolbar, select Open Debug Dialog...:
A dialog window opens, where you can start existing launch configurations, change them, or create new ones. On the left, select C/C++ QNX QConn (IP). This type of launch configuration is meant for network-based (cross) development with QNX Neutrino running on the target system, using the qconn program. Now click on the New launch configuration icon:
You will now be presented with many configuration possibilities that all deal with starting your executable program. Right now, only the Main tab needs your input. Later, however, you should also take a look at what the other tabs have to offer.
Next to the C/C++ Application field, press the Search Project button and choose your binary. If you compiled it with debug information, its name includes a suffix of _g. If you compiled it without debug information, its name doesn't include this suffix. Since we would like to start the Debugger in the next step, please choose the binary with the debug information. Click OK.
Make sure your target system is listed under Target Options, and then click Apply -- the launch configuration is now ready:
Starting and debugging
You should still be in the Debug launch configuration dialog. You just created a configuration for launching your program, which you now can start in the debugger. To do this, please click Debug.
The IDE now switches to the Debug perspective and transfers your program from your development machine across the network to your target QNX Neutrino system, and then starts it in the debugger. You will see that the debugger stops in the first line of your program. In the Debug view, you'll see an overview of your process, including the call stack. Using the buttons in the main bar of the Debug view, you can control the debugger.
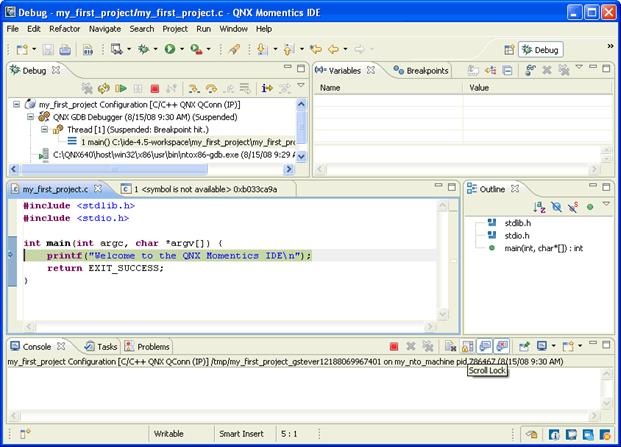
The Debug perspective.
When you run or debug your application from the IDE, any input is read from the IDE's console, and any output goes to it. Once execution has passed the line that calls printf(), you should see the "Welcome to the QNX Momentics IDE" message in the Console window.
Using the Step Over button, you can jump to the next line of code:
During debugging, you can watch the Variables view on the right, which displays how your variables change. You can use the Step Into button to let the debugger go into the code of a function (which, of course, is useful only if you have the source code for this function).
To set a breakpoint, place the mouse pointer over the left border of the source display, press the right mouse button and choose Toggle Breakpoint from the context menu. The breakpoint is shown as a little circle with a check mark, which you can also set or remove while you write your code.
Setting breakpoints.
When the running program hits a breakpoint, it stops in the debugger, and you can, for example, examine your variables. If you click the Resume button, your program continues until it hits the next breakpoint:

To abort program execution, use the Terminate button:
|
|
The debugger keeps the project's files open while the program is running. Be sure to terminate the debug session before you try to rebuild your project, or else the build will fail. |
After the program has finished running, use the Remove All Terminated Launches button to end the debugger and have your binary (which was previously transferred) deleted from your target system.
To run your program as a standalone binary (without the debugger), open the dropdown menu beside the Run icon and choose Open Run Dialog...:
Then you can use the launch configuration (described in the previous step) to start your program. Or create a new launch configuration and select the binary without debug information. You can also transfer your binary manually using the System Information Perspective's Target File System Navigator () and start it from the terminal. Mounting a shared network drive is also possible (see the entry for fs-cifs in the QNX Neutrino Utilities Reference).
Making the program your own
To turn the whole thing into your own first QNX program, you can modify and extend the source code we just created. Try some of our sample programs and copy code from them into your project. And now that you've started, you'll probably want a lot more information, such as how to create your own threads, how the QNX Neutrino message-passing works, which process-synchronization methods are available, how to get access to I/O areas, or how to build a QNX Neutrino resource manager. But don't worry: all this is (almost) as simple as the quick start you just experienced!
The IDE includes a number of tutorials to help you get started. Choose from the IDE's toolbar, and then click the Tutorials icon:

The IDE's Help system includes the QNX documentation, along with information about the Eclipse platform. In the Help menu, click Help Contents:

The Welcome to the QNX Software Development Platform guide helps you find out where to look in the documentation for the information you need. We recommend browsing the QNX Neutrino System Architecture guide, the IDE User's Guide, and the QNX Neutrino Programmer's Guide.
In the Help window, please choose:
- A Roadmap to the QNX Software Development Platform for information about the QNX Momentics Tool Suite and the QNX Neutrino RTOS
- IDE User's Guide for information about using the IDE
To view the documentation on self-hosted QNX Neutrino systems, just click the Help button on the icon bar on the right of the screen:
Printed documentation is also available.
Source code examples covering thread creation, usage of mutexes, message-passing and other methods of interprocess communication as well as a QNX resource-manager template can be found on our FTP server ftp.qnx.de; just use an FTP client to log in as user qnx with the password qnx!neutrino and download the source package. It contains a readme.txt file that explains how to import the source examples into the QNX Momentics IDE. The source features extensive comments, explaining what is done there. For every function you are interested in, you also should consult the QNX Neutrino Library Reference.
While you explore the QNX Momentics tools and the QNX Neutrino RTOS, you will probably have further questions. Please contact your QNX Account Manager, Field Application Engineer, or our support department. We want to be with you from the start, because we are successful only if you are!
5. Reference
- QNX Software system – http://www.qnx.com
- Vmware server
- others