Abstract 
The presence of duplicated code in software systems is significant and several studies have shown that clones can be potentially harmful with respect to the maintainability and evolution of the source code. Despite the significance of the problem, there is still limited support for eliminating software clones through refactoring, because the unification and merging of duplicated code is a very challenging problem, especially when software clones have gone through several modifications after their initial introduction. In this work, we propose an approach for automatically assessing whether a pair of clones can be safely refactored without changing the behavior of the program. In particular, our approach examines if the differences present between the clones can be safely parameterized without causing any side-effects. The evaluation results have shown that the clones assessed as refactorable by our approach can be indeed refactored without causing any compile errors or test failures. Additionally, the computational cost of the proposed approach is negligible (less than a second) in the vast majority of the examined cases. Finally, we perform a large-scale empirical study on over a million clone pairs detected by four different clone detection tools in nine open-source projects to investigate how refactorability is affected by different clone properties and tool configuration options.
@article{Tsantalis:2015,
	author={Tsantalis, Nikolaos and Mazinanian, Davood and Krishnan, Giri P.},
	journal={IEEE Transactions on Software Engineering},
	title={Assessing the Refactorability of Software Clones},
	year={2015},
	volume={41},
	number={11},
	pages={1055-1090},
	doi={10.1109/TSE.2015.2448531},
	ISSN={0098-5589},
	month={Nov},
}
Experiment data
We have provided the resulting files (input and output Excel files, HTML reports, CSV files and real code fragments) for every project and every tool separately in a .7z file. You can click on the corresponding cell to get the file.
| Project | CCFinder | Deckard | CloneDR | Nicad (Blind) | Nicad (Consistent) |
|---|---|---|---|---|---|
| Apache Ant 1.7.0 | Download | Download | Download | Download | Download |
| Columba 1.4 | Download | Download | Download | Download | Download |
| EMF 2.4.1 | Download | Download | Download | Download | Download |
| JMeter 2.3.2 | Download | Download | Download | Download | Download |
| JEdit 4.2 | Download | Download | Download | Download | Download |
| JFreeChart 1.0.10 | Download | Download | Download | Download | Download |
| JRuby 1.4.0 | Download | Download | Download | Download | Download |
| Hibernate 3.3.2 | Download | Download | Download | Download | Download |
| SQuirreL SQL 3.0.3 | Download | Download | Download | Download | Download |
* For the following projects we removed the classes corresponding to generated code, because generated code is excluded from analysis in most clone related studies:
|
|||||
Testing Results
To evaluate the correctness of our approach we refactored 610 clone pairs detected by Deckard in the src directory of JFreeChart 1.0.10 that were assessed as refactorable and were covered by unit tests.
We used the EclEmma Java code coverage Eclipse plugin to assess the test coverage of the clone fragments.
We provide the testing results in JFreeChart-1.0.10-tests.xls (that is located inside the .7z file).
For every clone fragment (i.e. row in the Excel file) we indicate whether it is fully covered, partially covered, or not covered by tests.
Gallery
- JFreeChart 1.0.10 -- Reordered statements.
-
JFreeChart 1.0.10 -- Symmetrical
if/else ifchains, and symmetricalif/elsematch. -
JFreeChart 1.0.10 -- Reordered statements, symmetrical
if/else ifchains, and symmetricalif/elsematch. -
Apache Ant 1.9.0 -- Replacement of field accesses with getter method calls,
replacement of field assignments with setter method calls, and replacement of
thisreference with a variable (i.e.,task). - Hibernate 3.3.2 -- Refactorable Type-3 clone pair.
- JFreeChart 1.0.10 -- Refactorable Type-3 clone pair.
- JFreeChart 1.0.10 -- Refactorable Type-3 clone pair.
- EMF 2.4.1 -- The largest clone found (314 statements)
Tools installation/usage guide
To obtain the latest versions of these tools (containing several improvements and bug fixes), please clone the master branches of the following GitHub repositories:https://github.com/tsantalis/JDeodorant.git https://github.com/tsantalis/jdeodorant-commandline.git |
|
| Authors | Nikolaos Tsantalis, Davood Mazinanian, Giri Panamoottil Krishnan |
| Headless application | Download |
| JDeodorant plug-in | Download
This is a special branch of JDeodorant used in the experiments that does not support advanced statement matching. |
Installation
- Download the Headless application and JDeodorant plug-in and import them as existing projects into your workspace.
- Right-click on the eclipse.commandline project and select "Run As" > "Run Configurations..."
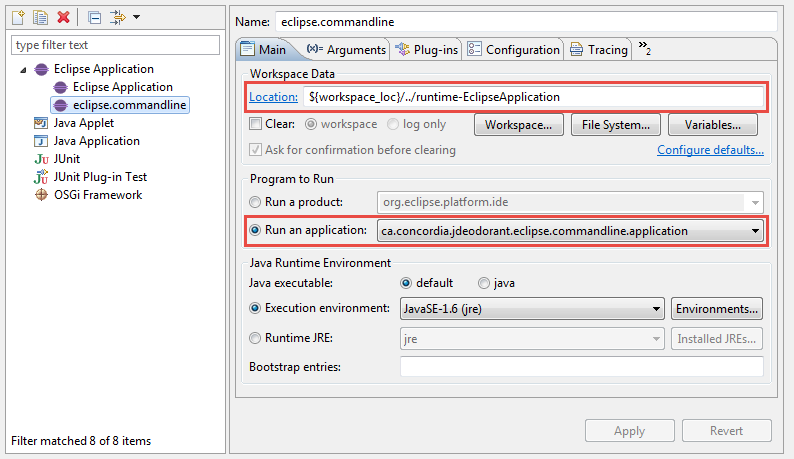
- Click on "Eclipse Application" and then on the "New launch configuration" button. Give a name to the newly created launch configuration (e.g., eclipse.commandline as shown in the screenshot below).
- In the "Main" tab
a) In the "Workspace Data" setup the "Location" to point to the workspace containing the projects that you want to analyze in headless mode. This must be a workspace directory created by Eclipse. You can create such a workspace by clicking on "File" > "Switch Workspace" and specifying a new workspace directory.
b) In the "Program to Run" select to "Run an application" and from the drop-down list select "ca.concordia.jdeodorant.eclipse.commandline.application" as shown in the screenshot below.
-
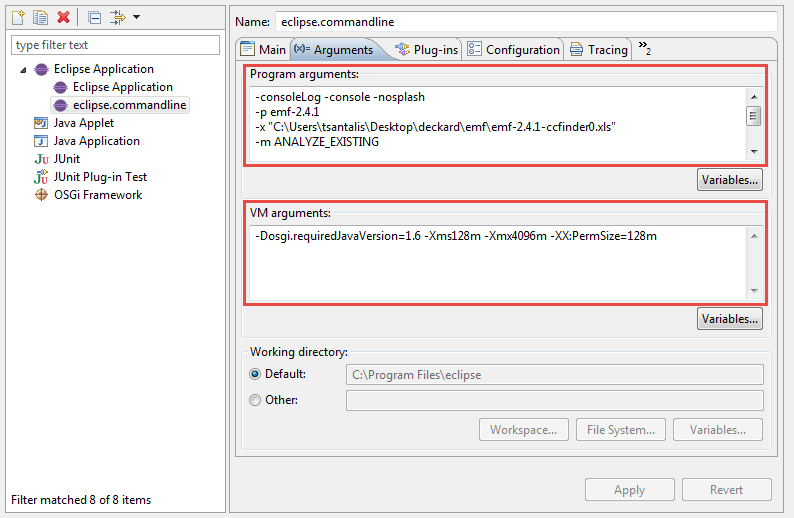
In the "Arguments" tab specify the "Program arguments" as explained in Section 5.2.
Next, specify the "VM arguments" as -Xms128m -Xmx4096m -XX:PermSize=128m (you can increase the Xmx value, if more memory is available).
Note: For your convenience, we have made available, for every project and every tool, the launch configuration necessary for running the tool. Inside each of the given 7z files in Table 1, there is a file with
.launchextension. You can import this file in Eclipse from File > Import > Run/Debug > Launch Configurations. However, you will need to update the absolute paths in the arguments. -
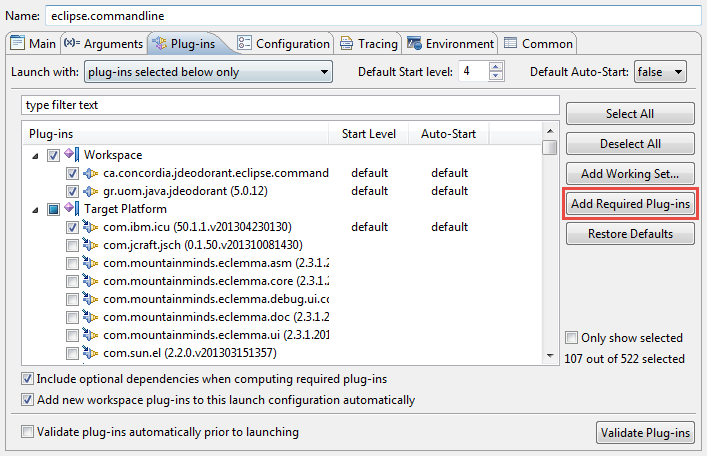
In the "Plug-ins" tab first select "plug-ins selected below only" in the "Launch with:" drop-down list.
Then select "ca.concordia.jdeodorant.eclipse.commandline (1.0.0.qualifier)" and click on "Add Required Plug-ins" button.
- Apply the changes in order to save the new Launch Configuration.
- Click Run to test whether the headless plug-in works properly. If you are getting BundleExceptions, go back to the "Plug-ins" tab and select Launch with: "all workspace and enabled target plug-ins". Apply the changes and Run again the headless plug-in.
Command-line arguments
| Long argument | Short argument | Mandatory | Default value | Description |
|---|---|---|---|---|
| --help | -? | No | N/A | Displays arguments and their explanations |
| --mode {mode_of_operation_constant} | -m {mode_of_operation_constant} | No | ANALYZE_EXISTING | Mode of operation. See below for more information |
| --project {project name} | -p {project name} | Yes | N/A | Name of the project in the Eclipse workspace |
| --excelfile | -x {path/to/the/xls/file} | Yes | N/A | Path to the input (ouput, in the PARSE mode) .xls file |
| --tool {tool_name_constant} | -t {tool_name_constant} | No | - | Specifies the clone detection tool. See below for more information |
| --tooloutputfile {absolute or relative path to the input file} | -i {path/to/the/input/file} | No | - | Path to the main output file of the clone detection tool |
| --extra-args {arg1,arg2, ...} | -xargs {arg1, arg2, ...} | No | - | Comma separated list of extra arguments which are needed in case if we use specific clone detection tools. See below for more information. |
| --row-start-from {row} | -r {row} | No | - | Specifies the row number (starting from 2, row 1 is the header) of which the tool must start the analysis. |
| --append-results | -a | No | - | Specifies whether the existing outputs (Excel file, CSV files) must be appended by new results or they must be overridden. |
| --skip-groups {group_id1, group_id2, ...} | -s {group_id1, group_id2, ...} | No | - | A comma separated list of clone group IDs to be skipped from the analysis. |
| --test-packages {package1,package2,...} | -testpkgs {group_id1, group_id2, ...} | No | - | A comma separated list of the fully-qualified names of the packages containing test code. This will be used to distinguish test code from production code, which could be used in, for example, statistical analysis. |
| --test-source-folders {folder1,folder2,...} | -testpkgs {folder1,folder2,...} | No | - | A comma separated list of the source folder names containing test code. This is similar to the previous argument. |
Mode of Operation
The headless application works in three different modes.
These modes are explained in the following table.
For running the tool in each of these modes, use appropriate value for --mode (or -m) argument.
Value for --mode argument |
Description |
|---|---|
| PARSE |
In this mode, the output file of a clone detection tool will be parsed to an Excel file.
You mist give the path to the Excel file using -excelfile (or -x) argument.
You must also provide the name of the clone detection tool (using --tool argument and based on Table 3),
the path to the input file (the output of clone detection tool, using tooloutputfile argument),
and for some specific clone detection tools, an extra argument (using --xargs).
Please see Section 5.4 for more information.
|
| ANALYZE_EXISTING |
In this mode, the tool analyzes an existing Excel file.
Again, the path to the Excel file must be given using -excelfile (or -x) argument.
The results of the analysis will be written in the same folder as the input Excel file.
These results are explained in Section 5.5).
|
| PARSE_AND_ANALYZE | This mode first parses the output of the clone detection tool, and then analyzes the parsed Excel file. All the arguments in the PARSE mode must be also provided in this mode. |
The input (and output) Excel files
The input Excel file must be in Excel 97-2003 (.xls) format. Please note that, the tool cannot handle .xlsx files. This excel file will contain the columns, as shown in Table 5. The first row of the Excel file is used as header row. In Table 5, column names are sorted as they appear in the Excel file. For the analysis, the input Excel file must contain the information for some of the columns, while for other columns, the cells will be filled during the analysis.
In the Excel file, each row is for one clone. Each clone is a code fragment which is detected to be duplicated in another part of the system. Several clones in the consecutive rows belong to one clone group. Hence, each possible pair of clones inside a clone group are code fragments that are duplicated. The row corresponding to the first clone of every clone group contains some information about the clone group, including values for Clone Group Size, Clone Group Info and Connected columns. Please find the information about these columns in the following table.
| Column | Description |
|---|---|
| Clone Group ID | An integer assigned to every clone group. For all the clones inside one clone group, the value of this cell is similar, which is the ID of the clone group to which these clones belong. |
| Source Folder | The source folder of the class file to which this clone belongs. |
| Package | Fully qualified path to the package of the class file to which this clone belongs. |
| Class | Name of the class file to which this clone belongs. |
| Method | Name of the method in which this clone exists. Please note that, currently there is no support for the clones outside of the boundaries of methods. |
| Method Signature | Signature of the method in which this clone exists, in the Bytecode format. |
| Start Line, End Line, Start Offset, End Offset | Starting and ending lines and offsets of the clone fragment. |
| #PDG Nodes | Number of PDG nodes in the method in which this clone exists. This column will be filled after analysis on this clone is done. |
| #Statements | Number of statements in the clone fragment that is reported to be a clone. This column will be filled after analysis on this clone is done. |
| Clone Group Size | Number of the clones in the clone group. This value only comes in the first row of the clone group. |
| Clone Group Info | Type of the clone group. It might be Repeated when the entire clone group is repeated, or Subclone when the clones in this clone group are sub-clones or super-clones of clones in another clone group. In these two cases, our tool will skip the clone group for analysis. |
| Connected | If the value of the previous cell is Subclone, this cell contains the clone group ID of the clone group of which this clone group is a sub-clone (or super-clone). |
| Clone Pair Location | Location of the clones in the clone group. Clones could be in the same in the same method, in the same class, or in different classes. |
| #Refactorable Pairs | Number of refactorable pairs in the clone group, which is calculated after the analysis. |
| Details |
Each pair of clones in every clone group is analyzed by the tool. When the analysis finished, in this column, and the following columns in the same row, hyperlinks to the HTML reports of the analysis of the clone pair corresponding to this row and all other clones in the same clone group are given. The name of the hyperlink is in the format {clone group ID}-{first clone number}-{second clone number}.
If the background color for a cell is
|
A sample empty Excel file is provided here. Also, the the Excel files that we generated for this paper are provided in Table 1.
Using the output of clone detection tools
The output of a clone detection tool must be first converted to the desired Excel file. For convenience, we have provided parsers for the popular clone detection tools, as an internal feature in the command-line tool.
When the tool is executed in the PARSE or PARSE_AND_ANALYZE modes, user has to provide the tool with the output file
of the clone detection tool, using --tooloutputfile (-i) argument.
Also, the name of the clone detector must be specified using --tool (-t) argument.
For example, the following arguments can be used to parse and analyze an output from CCFinder for project Apache Ant:
				-p apache-ant-1.7.0

				-x "apache-ant-1.7.0-ccfinder.xls"

				-m PARSE_AND_ANALYZE

				-t CLONE_TOOL_CCFINDER

				-i "ccfinder.ccfxd"

				-xargs "D:\Results\CCFinder\apache-ant-1.7.0\src\.ccfxprepdir","src"

				-testsrcs "src/tests/junit"
For the moment the tool supports four different clone detection tools, as shown in the table below.
The value for --extra-args- (-xargs) argument depends upon the tool, and provides necessary information for parsing the input file.
For instance, in this example we have provided two additional strings through this argument, separated by comma.
| Clone Detection Tool | --tool (-t) |
--extra-args- (-xargs) |
|---|---|---|
| CCFinder | CLONE_TOOL_CCFINDER |
|
| Deckard | CLONE_TOOL_DECKARD | Not needed |
| CloneDR | CLONE_TOOL_CLONEDR |
Path to the folder where the analyzed project was initially located (This is important because these tools save absolute paths to the analyzed Java files) |
| Nicad | CLONE_TOOL_NICAD | |
Output of the commandline tool
Tool generates an Excel file, with the same name (appended by -analyze) and in the same path as the input Excel file which contains the results of the analysis.
You can find the information about the columns of this Excel file in Table 5.
The HTML reports of the analysis can be found in a folder named html.reports which is located in the same folder as the input and output Excel files.
You can see samples of these HTML reports in Section 4.
When the tool is used to parse the output of a clone detection tool, a folder named code-fragments in the same path as the input and output Excel files is created,
which contains the real code fragments as reported by the clone detection tool.
The names of these files are in the format {ID}-{CLONE_NUMBER}, where {ID} is the ID of the corresponding clone group to which this clone belongs,
and {CLONE_NUMBER} is the clone's index in current clone group. This helps in mapping Excel file rows (clones) to these files.
For those who are interested in performing statistical analysis using tools such as R, Matlab, etc, the tool generates CSV files containing information gathered during analysis. Three CSV files are created, as explaned below. Please note that, the separator in these files is pipe ("|") character. The first row of these files is header.
{INPUT_EXCEL_FILE_NAME}.report.csv
Contains general information about the refactorability analysis results. Every row in these files corresponds to a single clone pair. The columns in the order they appear in the CSV files are:
| Column Name | Description |
|---|---|
| GroupID | ID of the clone group of this clone pair |
| PairID | ID of the clone pair, created by appending clone indices with a hyphen between them |
| ClonePairLocation |
Identifies the relative location of clones. One of these values:
|
| IsTestCode |
Identifies whether the clone is test code or not. It may have one of these values:
|
| #StatementsInCloneFragment1 & #StatementsInCloneFragment2 | Number of statements (AST nodes) in clones that were analyzed. Note that, this might be different from what was reported by the clone detection tool, as tool applies filtering on the AST nodes, as discussed in the paper. |
| #NodeComparisons | Number of node comparisons that were done to assess the refactorability of the clone |
| #PDGNodesInMethod1 & #PDGNodesInMethod2 | Number of PDG nodes in the analyzed method bodies |
| #RefactorableSubtrees | Number of subtrees in the analyzed methods that can be refactored |
| SubtreeMatchingWallNanoTime | Time spent in finding the common nesting structures between the compared methods (in Nano seconds) |
| Status |
Identifies the status of the analysis, one of the following values:
|
{INPUT_EXCEL_FILE_NAME}.trees.csv
For every clone pair, more than one subtree may be found which could be refactorable or not. This file contains the information about every subtree. The columns in the order they appear in the CSV files are:
| Column Name | Description |
|---|---|
| GroupID & PairID | Used to identify to which clone pair this subtree belongs |
| TreeID | Index of the subtree for this clone pair |
| CloneType | Type of the clone which could be 1, 2, 3 or Unknown (4) |
| PDGMappingWallNanoTime | Time spent to map PDG nodes, |
| #PreconditionViolations | Number of Precondition Violations, |
| #MappedStatements | Number of mapped statements. If this value is more than zero and also #PreconditionViolations is zero, the subtree is refactorable, |
| #UnMappedStatements1 & #UnMappedStatements2 | Number of unmapped statements in the first and second subtree, |
| #Differences | Number of differences in the mapped statements. |
{INPUT_EXCEL_FILE_NAME}.precondviolations.csv
This file contains information about precondition violations for each subtree, if the subtree was not found to be refactorable. The columns in the order they appear in the CSV files are:
| Column Name | Description |
|---|---|
| GroupID, PairID & TreeID | Identifies to which subtree this precondition violation belong |
| PreconditionViolationType |
Type of the precondition violation, one of the following values:
|
R Scripts
You can download the R scripts we developed for the analysis of the experiment data from here.
The scripts and CSV files can be found inside the Scripts and CSVs folders, respectively.
If you use R Studio, you can open the R Project by opening the file RProject.Rproj.
The script files are:
-
load.R: contains the functionload()which loads all the necessary tables to the environment. By default, this function looks at a directory namedCSVsin the current working directory and loads all the CSV files in that directory. You may provide the folder containing CSV files using the argument for this function. -
refactorable-clone-pairs.R: generates the information about the refactorability of clones. It contains the following functions:printProductionCodeResultsTable()andprintTestCodeResultsTable: Prints the table about refactorability of production and test code, respectively, for every project and every clone detection tool. For getting the information about all the results, use functionprintAllCodeResultsTable().testVSProduction(): Displays the information about the refactorability of test vs production code for every clone detection tool.printRefactorableLocation(): Displays the information about the refactorability of code in different locations for every clone detection tool.printRefactorableCloneType(): Displays the information about the refactorability of different clone types for every clone detection tool.
-
efficiency.R: contains the functionplotNumberOfNodeComparisons()which generates a plot showing the number of node comparisons performed by our technique vs. a brute force approach. -
size.R: contains two functions:plotSizes(): generates a plot showing the size of the clones for each clone detection tool.plotSizeRefactorable(): generates a plot showing the size of the refactorable and non-refactorable clones for each clone detection tool.
Clone detection tools
In this experiment, we used the results of four popular clone detection tools for the experiments.
CCFinder
| Authors | Toshihiro Kamiya, Shinji Kusumoto, and Katsuro Inoue |
| Publication | "CCFinder: A Multi-Linguistic Token-based Code Clone Detection System for Large Scale Source Code," IEEE Transactions on Software Engineering, vol. 28, no. 7, pp. 654-670, (2002-7). |
| Clone detection approach | Token based |
| URL to download | Download |
| Version we used | 10.2.7.4 |
All you need to run CCFinder is to download and install CCFinderX, a major version of CCFinder, from the given URL. (There are some documentation for installing CCFinder on Ubuntu Linux here, while we installed and tested it on Windows. Note that, you will need Phyton 2.6 installed on your operating system (we used 2.6.5, Python 2.7 or later versions didn't work). Also, JRE version 5 or later must also be installed (we tried version 7 Update 51).
CCFinderX is a major version of CCFinder which provides a useful GUI for using CCFinder.
After installation, you can run the tool by running /bin/gemx.bat (on Windows).
From GUI, select File > Detect Clones. Select your desired programming language, add the folders of the source files of the project under investigation, and select Next.
In the next window, you can configure CCFinder for clone detection. As mentioned in the paper, we used these options for our analysis:
| Minimum clone length | 50 |
| Minimum TKS | 12 |
| Shaper level | 2 - Soft shaper |
| P-match application | Use P-match |
| Prescreening application | Unchecked (Does not affect the clone detection process) |
Deckard
| Authors | Lingxiao Jiang, Ghassan Misherghi, Zhendong Su, Stephane Glondu |
| Publication | "DECKARD: Scalable and Accurate Tree-Based Detection of Code Clones," The 29th International Conference on Software Engineering, 2007 |
| Clone detection approach | Tree based |
| URL to download | Download - Alternative URL |
| Version we used | 1.3 |
We compiled Deckard in Ubuntu 13.04 X86, using the steps given in the README on Deckard's Github page.
The running instructions are also given in the same page. Note that, you only need to run Deckard using what is described in the first part of the Usage section in the
mentioned page (For clone detection, using file deckard.sh).
Note: we were not able to run the version of Deckard on Github, it has a problem in the vector generation phase. We used the one given in the alternative URL and it worked.
To configure Deckard, you have to modify the config file in the same folder that deckard.sh file exists.
You can follow the comments in the config file to make sure that you config it correctly. In this research, we have used the following values for the options in the
condig file:
| MIN_TOKENS | 50 |
| STRIDE | 0 |
| SIMILARITY | 0.95 |
CloneDR
| Authors | Ira D. Baxter, Andrew Yahin, Leonardo Moura, Marcelo Sant’Anna and Lorraine Bier |
| Publication | “Clone detection using abstract syntax trees,” in Proceedings of the International Conference on Software Maintenance, 1998, pp. 368–377. |
| Clone detection approach | AST based |
| URL to download | Download |
| Version we used | 2.2.12 |
We run CloneDR on Windows 8.1. You should contact Semantic Designs to request an academic license for CloneDR, because the evaluation version reports only 10 clone groups. After installation and registration, run DMS Project Specifier tool, configure it with the following options, select the path of the project you are going to analyze and run the tool.
| Similarity threshold | 0.95 |
| Max clone parameters | 65,535 |
| Min clone mass | 6 |
| Characters per node | 16 |
| Starting depth | 2 |
Nicad
| Authors | Chanchal Kumar Roy, James R Cordy |
| Publication | "NICAD: Accurate Detection of Near-Miss Intentional Clones Using Flexible Pretty-Printing and Code Normalization," The 16th IEEE International Conference on Program Comprehension, 2008 |
| Clone detection approach | Text based |
| URL to download | Download |
| Version we used | 3.5 |
We installed Nicad on Ubuntu Linux 14.04 LTS X64. Please note that, to run Nicad, you'll first need to download and install TXL from here.
The instructions found in the readme file in the Nicad's folder is straightforward for installing and running it. Please note that, as its authors
have changed the name of the runnable file to "nicad3", in the "Testing Nicad3" and "Using Nicad3" sections of the readme file, instead of running
nicad functions java... in the terminal, you should run nicad3 functions java....
For configuting Nicad, you have to make a copy of the default.cfg file in the config folder in the Nicad's directory, and change the desired
parameters in it.
Below are the parameters we changed from default config file, which were used for running Nicad in this experiment.
Note that, you have to append the name of the config file (without extension) at the end of your command which runs Nicad
(see the mentioned Readme file for the sample commands.)
| minsize | 5 |
| maxsize | 2500 |
| threshold | 0.2 |
| rename | blind |